Start in DaVinci Resolve Studio.
▶ Unsure about this page? Watch it in the video at 0:0024Cuts does not replace Resolve. It works inside your project, through the Resolve scripting API, reading the Media Pool and writing timelines back into it. So the session starts where it always did.
On screen
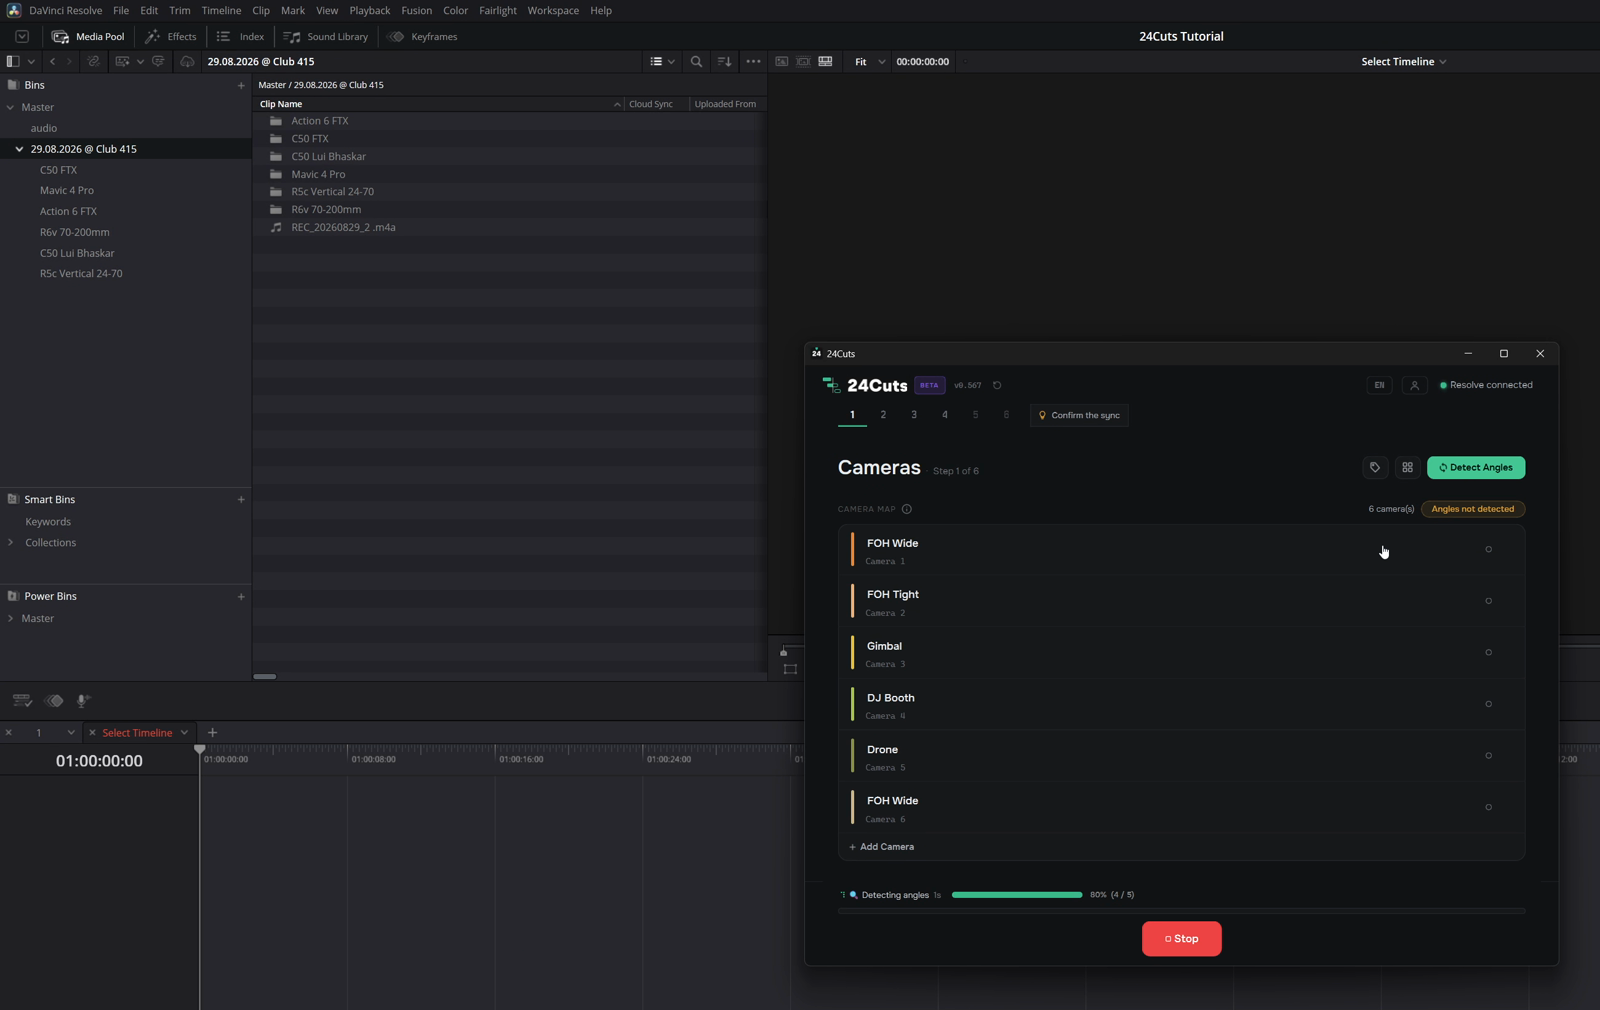
24Cuts open over Resolve, connected to the project, with the Camera Map already listing the cameras found in the Media Pool.
Step by step
- Open DaVinci Resolve Studio and create the project for this session.
- Import the footage of every camera into the Media Pool. One bin per camera keeps Page 1 fast, but a single bin also works.
- Import the master audio files from the recorder. In our session, that is the two Zoom files.
- Leave the project open. 24Cuts connects to whatever project is open in Resolve.
- Open 24Cuts. The status in the top bar turns to Resolve connected. If it does not, click Connect on the first page.
Good practice
- Use the latest 24Cuts version, for Mac or Windows. The pages in this guide match the current release.
- Keep the media online. A clip that Resolve shows as offline is skipped by every step that follows.
Tell the app which camera is which.
▶ Unsure about this page? Watch it in the video at 0:18Page 1 builds the Camera Map: a list of every angle in the project, each one with a class. The class is how 24Cuts understands an angle. Wide, close, crowd, drone. Every model you will use later reasons in classes, not in file names.
Once written, the map lives inside the Resolve project. Close the app, reopen it next week, and Page 1 is still done.
On screen
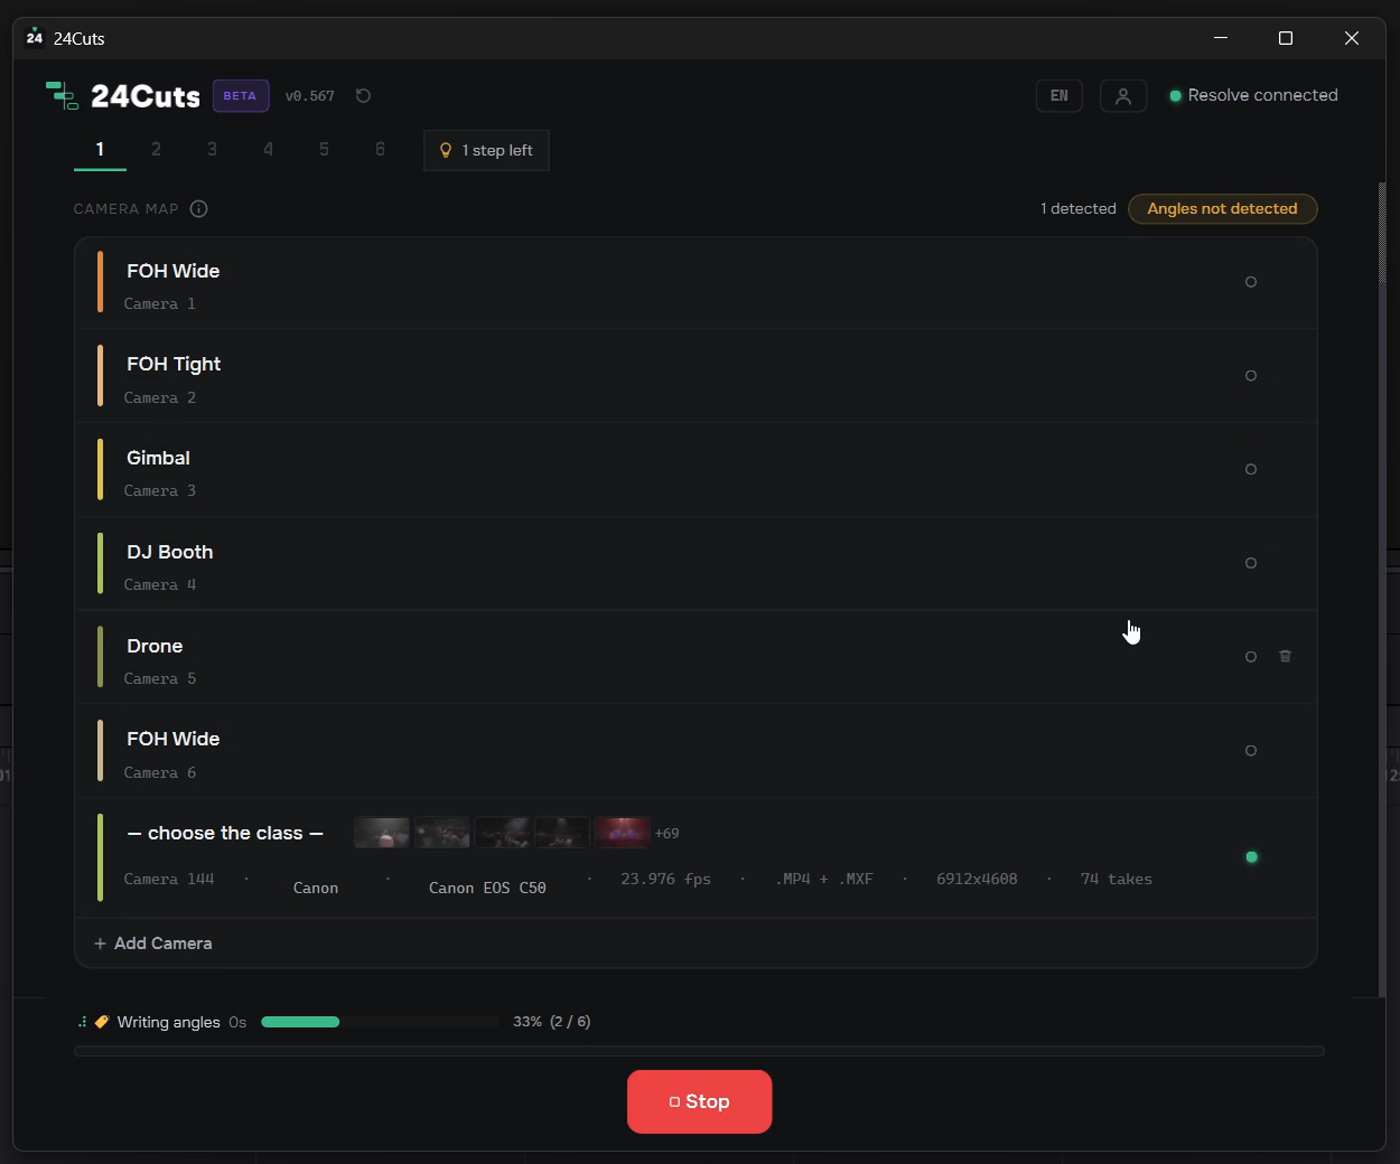
Camera Map with the classes chosen and Write Angles running: the class information is being recorded into the project.
Step by step
- Look at the list. Each row is one camera the app found in the Media Pool. Hover a row to see the file path, or check the file name, to know which camera it is.
- If two cameras landed in the same row, click Split folders by file to see every video file on its own.
- For each row, pick the class that describes the angle: wide, close, crowd, drone, or any class you create. One class per camera, however many cameras you have.
- Delete the cameras you will not use. The app will not move on while a camera has no class or an unused camera is still listed.
- Optionally, set a color for each angle. It becomes the clip color of that camera in every timeline the app creates.
- Click Write Angles. The classes are recorded in the project.
Good practice
- Need a class the list does not have? Open Manage classes and create your own. Custom models trained on Page 4 will use it. Remember, a new class requires a new model to be trained using this class. Otherwise, the app will not use cameras with the new class.
- You can add a new angle or remove one at any time, even after the cut. Just write the angles again.
Line everything up, to the frame.
▶ Unsure about this page? Watch it in the video at 1:24Page 2 runs the sync engine. It reads timecode where a camera has it, and listens to the audio where it does not, then verifies every clip frame by frame. The result is a new timeline in your project, named 24Cuts AutoSync, with each camera on its own video track and the master audio on A1.
On screen
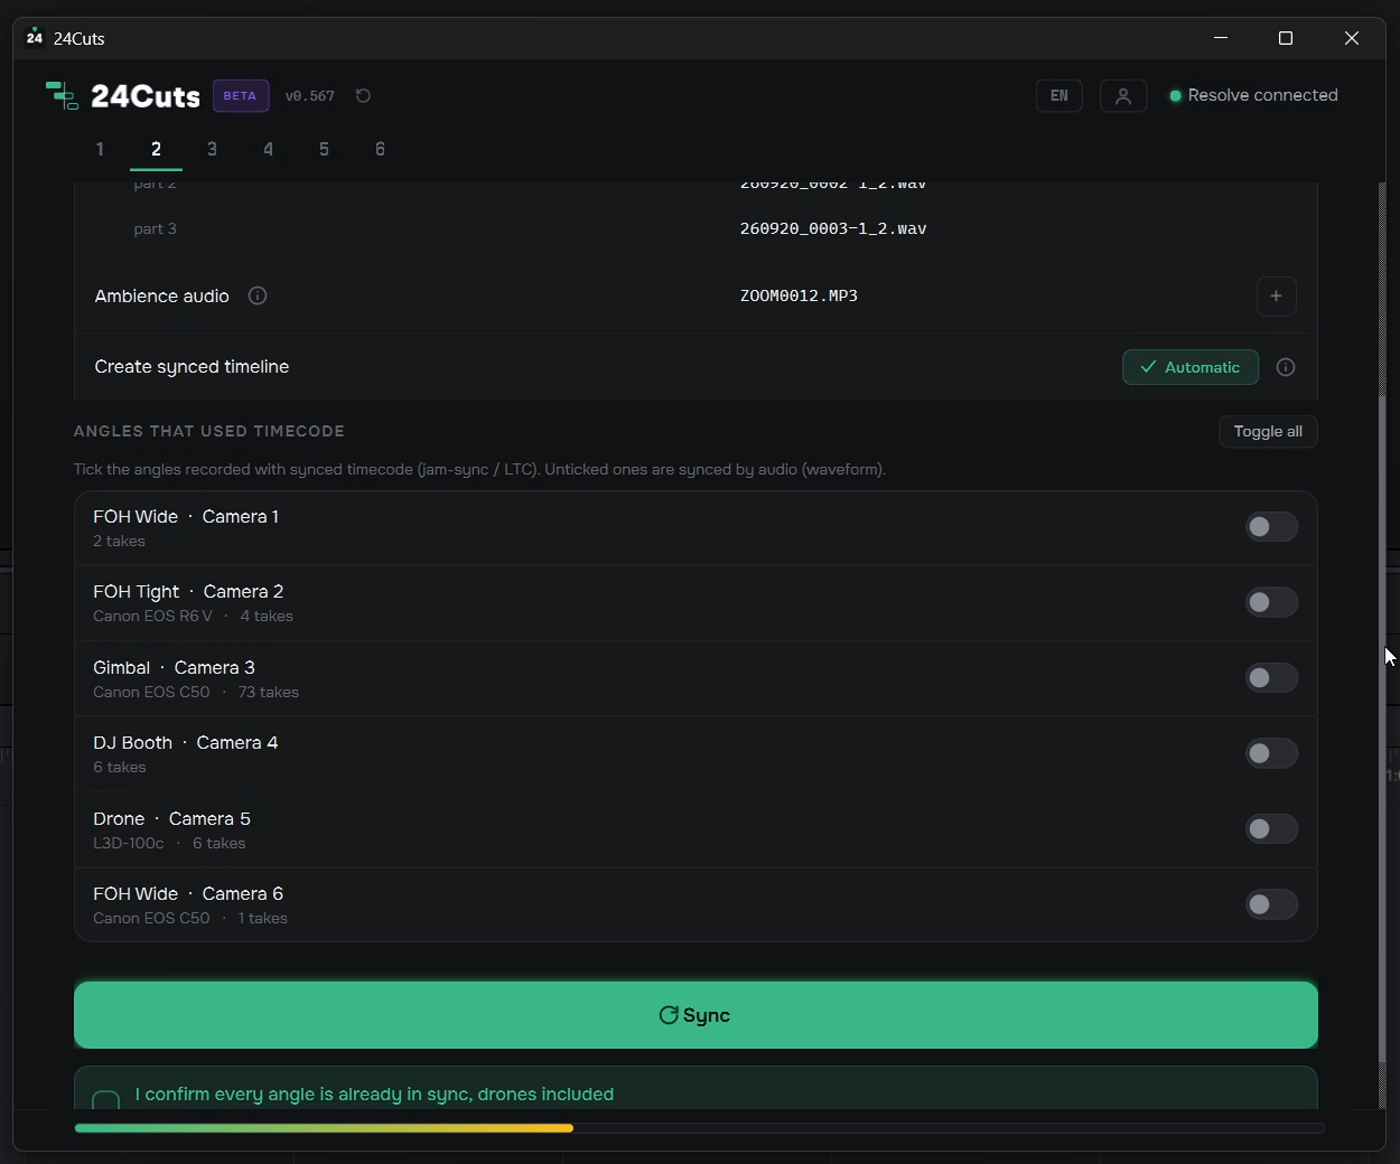
Sync page: the reference audio in three parts, the ambience audio, one timecode toggle per camera, and the Sync button.
Step by step
- Already synced by hand? Check Already synced, choose that timeline, and skip to Page 3. Pages 5 and 6 unlock right away.
- Otherwise, choose the method. If any camera has timecode, choose Timecode. That is the hybrid mode: timecode where it exists, audio where it does not. With no timecode at all, choose the first option, audio.
- Pick the reference audio: the master from the mixer. Our Zoom split it in two files, so click + and add the second file right after the first, in order.
- Add any ambience audio the same way. Every source you add gets synced.
- In the Timecode menu that appeared, tick every camera that used timecode. Leave the others unticked.
- Click Sync and wait. Leave Resolve alone while the app works.
- To move on, click Already Synced. If the project has more than one timeline, the app asks which one to use. Pick 24Cuts AutoSync 1 and click OK.
Drones: keep the .SRT next to each flight
A drone records several flights with gaps between them. Import each drone clip together with its .SRT file, the flight log the drone writes next to the video, into the Media Pool. 24Cuts reads the timestamps in the .SRT and rebuilds the gap between flights, so the whole drone block lands on the timeline with the right spacing. You then sync that block once, as one piece, instead of flight by flight.
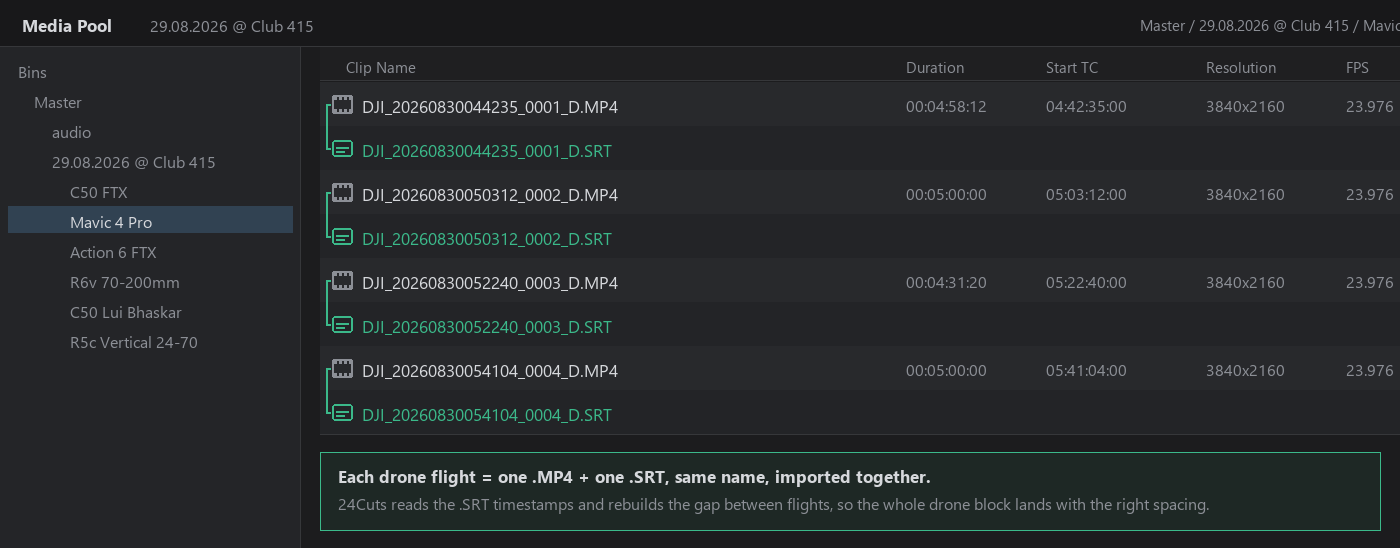
Good practice
- Do not click around in Resolve during the sync. The app is writing to the timeline and a change of page in Resolve can interrupt it.
- Open the AutoSync timeline and scrub a drop. If a camera is off, fix it there, on the timeline. Every next step reads the timeline, not the files.
Page 3 is where 24Cuts reads the music. It finds the drops, the builds and the breaks, and marks the phrases and pre-drops of the set. Every decision of the cut, later, is anchored to these moments.
You can analyze the audio straight from the timeline, or import the structure of the set from Rekordbox. Rekordbox is our recommendation: it is very precise on timing and phrases, and it is free.
On screen
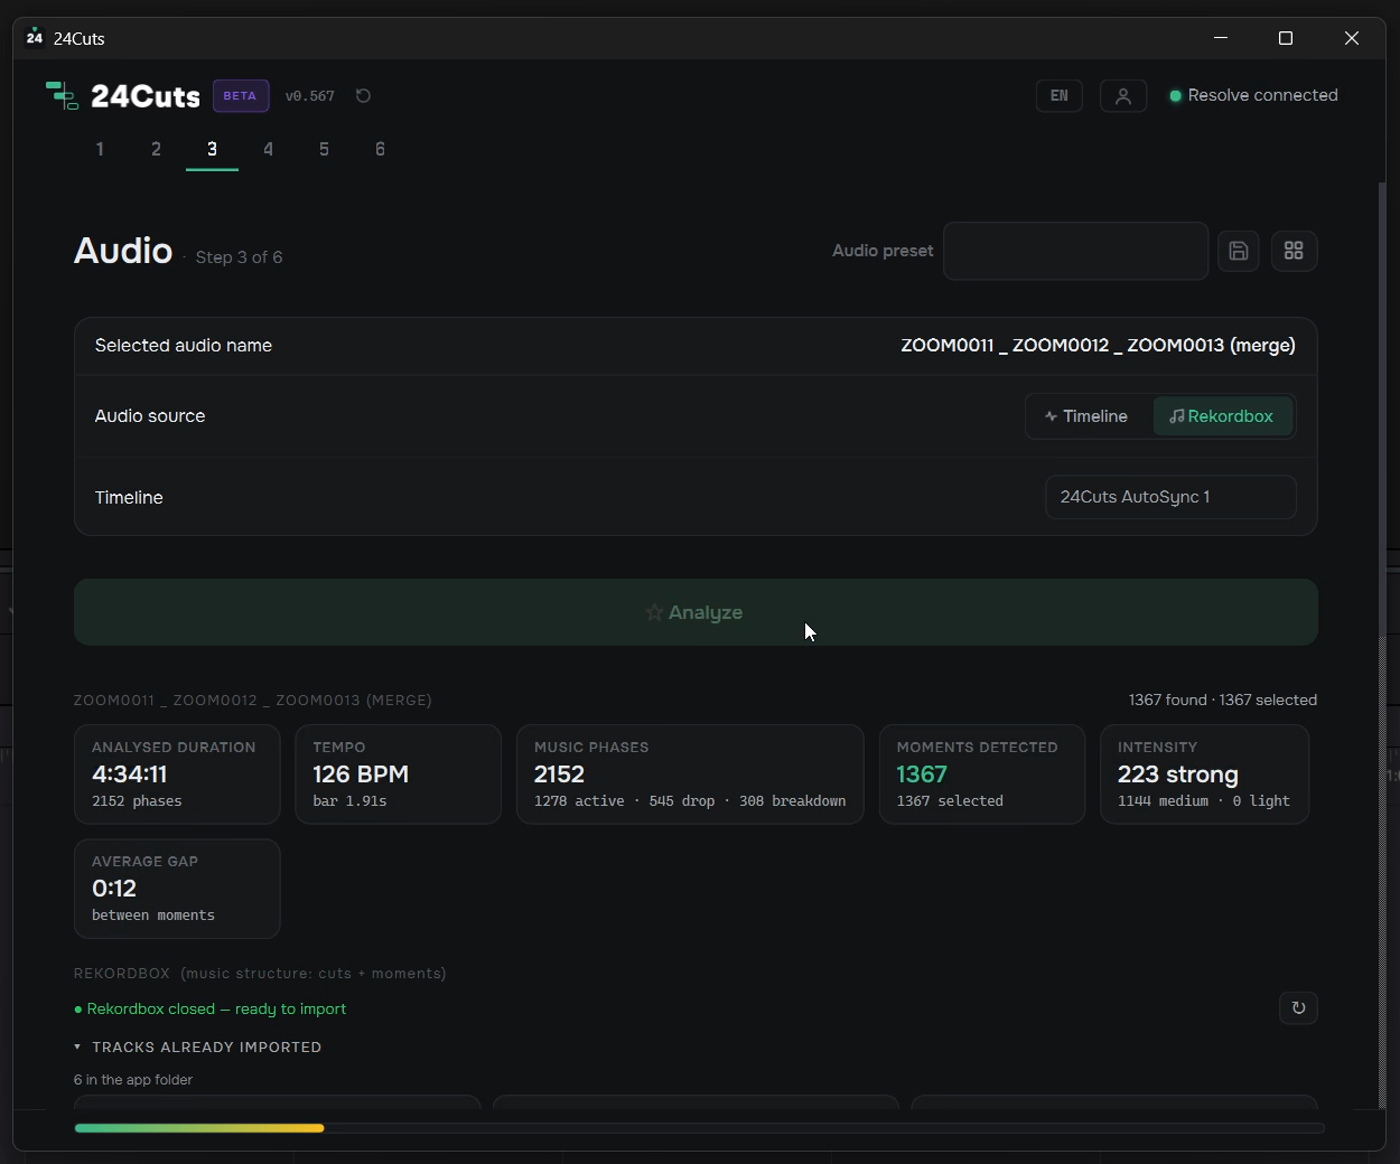
Audio page after Analyze: analysed duration, tempo, music phrases, moments detected, intensity and average gap.
Step by step
- Choose the audio source. Timeline uses the reference audio synced on A1. Rekordbox reads tracks and cue points from the Rekordbox library.
- For Rekordbox, prepare the audio first. Open Rekordbox, import the master audio files, and analyze them with High Precision BeatGrid Analysis, ticking BPM/Grid, Key, Phrase and Vocal. Wait for the bar to reach 100%, then close Rekordbox.
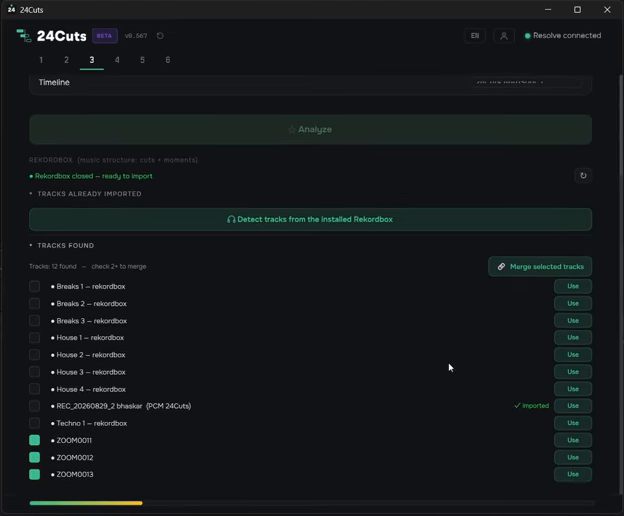
- Back in 24Cuts, select Rekordbox and click Detect tracks from the installed Rekordbox. If the status is not green, Rekordbox is still open: close it and click the refresh button.
- Find the track by name and click Use. Some recorders, like Tascam and Zoom, split a very long session into several files: in that case import all of the files into Rekordbox and analyze each one; then, back in 24Cuts, select them all and click Merge selected tracks. Our session came split, so we selected every file of it.
- The track moves to Tracks already imported. Next time, it is already there.
- If you did not choose the Rekordbox option, select the audio track, A1. The name of the audio shows right below, so you can double check.
- Click Analyze and wait a moment.
- Read the summary: Duration, Tempo, Music Phrases, Moments Detected, Intensity and Average Gap.
Good practice
- Save the setup as an Audio Preset. On the next session with the same rig, pick it from the list and Page 3 is one click.
- Rekordbox often refuses very large WAV files, close to 4 GB. If that happens, convert the file to MP3 at 320 kbps without touching its duration, and import it into Rekordbox again.
Teach the app your own cut.
▶ Unsure about this page? Watch it in the video at 5:03A cut model is learned from one timeline you already edited by hand. Give 24Cuts a set you cut and it reads it cut by cut: which class is on screen at each moment of the music, how long each shot holds, in bars, which camera follows which, and how you behave on the drops, builds and breaks. It also measures how much screen time each class gets and how often you change camera on the bass. All of it becomes the model's DNA: Rhythm, Hold and Drop.
Training runs on three pages, Page 1, Page 3 and Page 4, the same pages you use on a new set, but on the edited project instead. Two details decide whether the model learns the right thing: the timeline must be flattened from compound clips and multicam, and it must start where the reference audio starts.
On screen

The edited set in Resolve: one video track per class, the reference audio on A1 starting at the very first frame of the timeline.
Step by step
- Open a project with a set you already cut by hand. The edit must be on a normal timeline: if it uses multicam or compound clips, flatten them first, and remove any leftover clips you do not want the model to learn from.
- Make sure the edited timeline starts where the A1 track starts. The first frame of the timeline must be the first frame of the reference audio on A1. Trim anything before it. 24Cuts aligns the whole analysis to A1, so an offset here shifts every cut it learns.
- Page 1: build the Camera Map for this project. One class per camera, then Write Angles. The classes are what the model learns, so name them the way you will use them on future sets.
- Page 3: analyze the audio of the edited timeline. Select that timeline and the A1 track, or the matching Rekordbox track, and click Analyze. The model needs the drops and phrases to relate each of your cuts to the music.
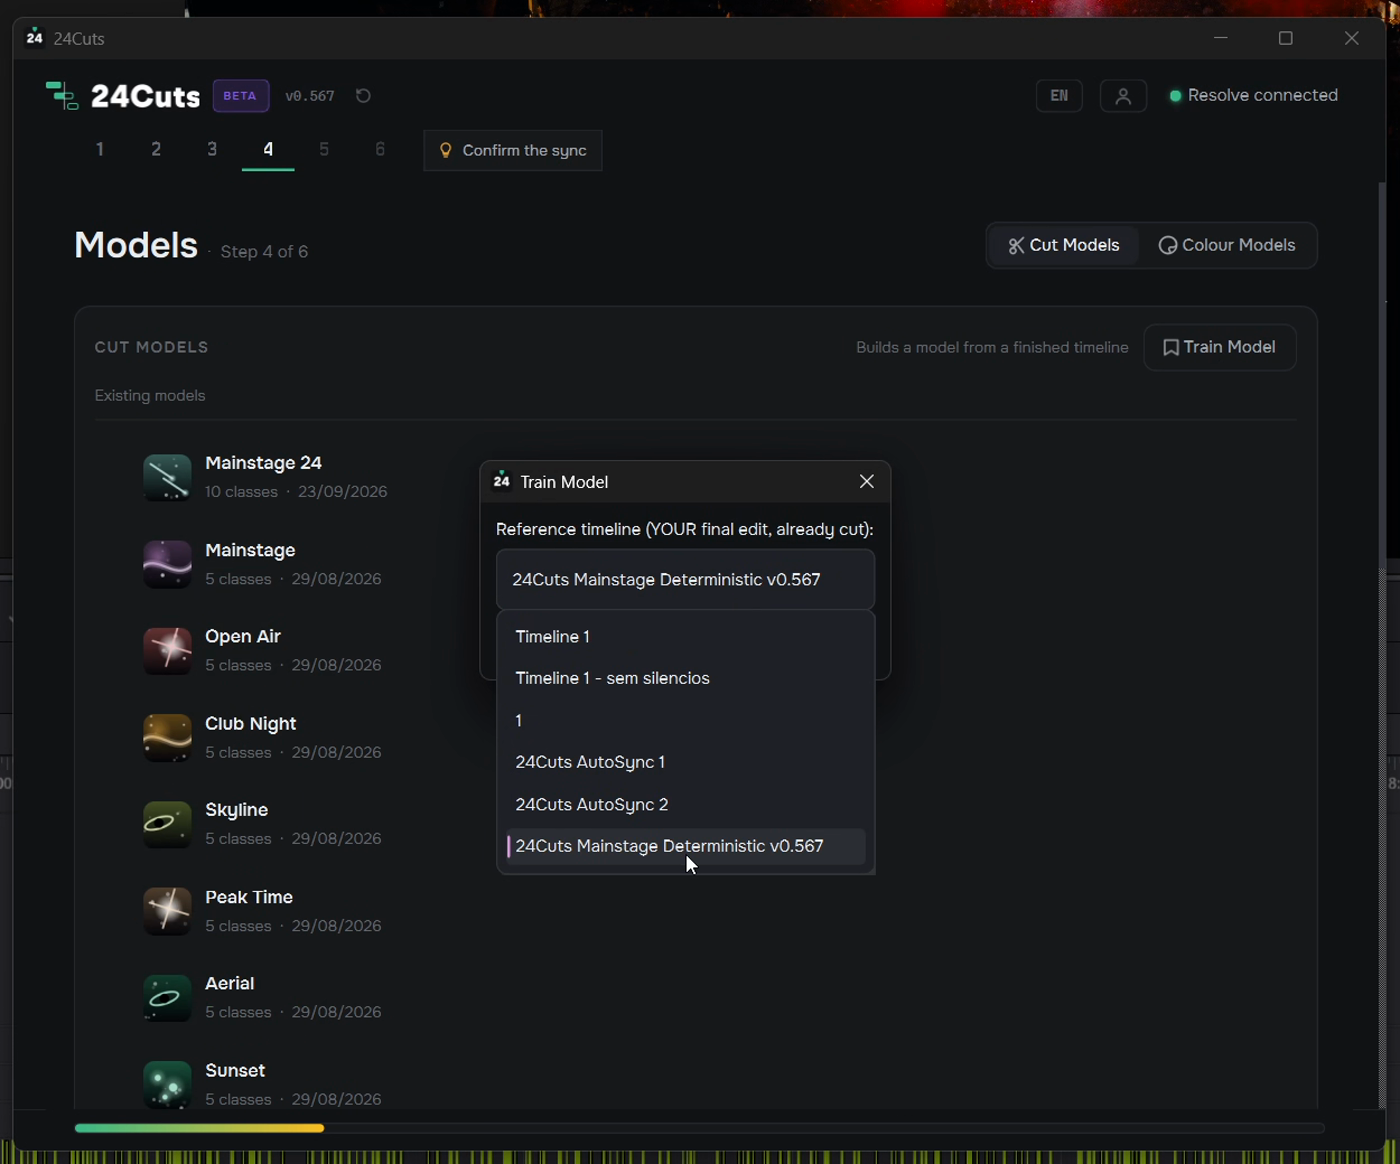
- Page 4, Cut Models: click Train Model and pick the edited timeline in the dialog. Training takes a moment; the progress bar shows it.
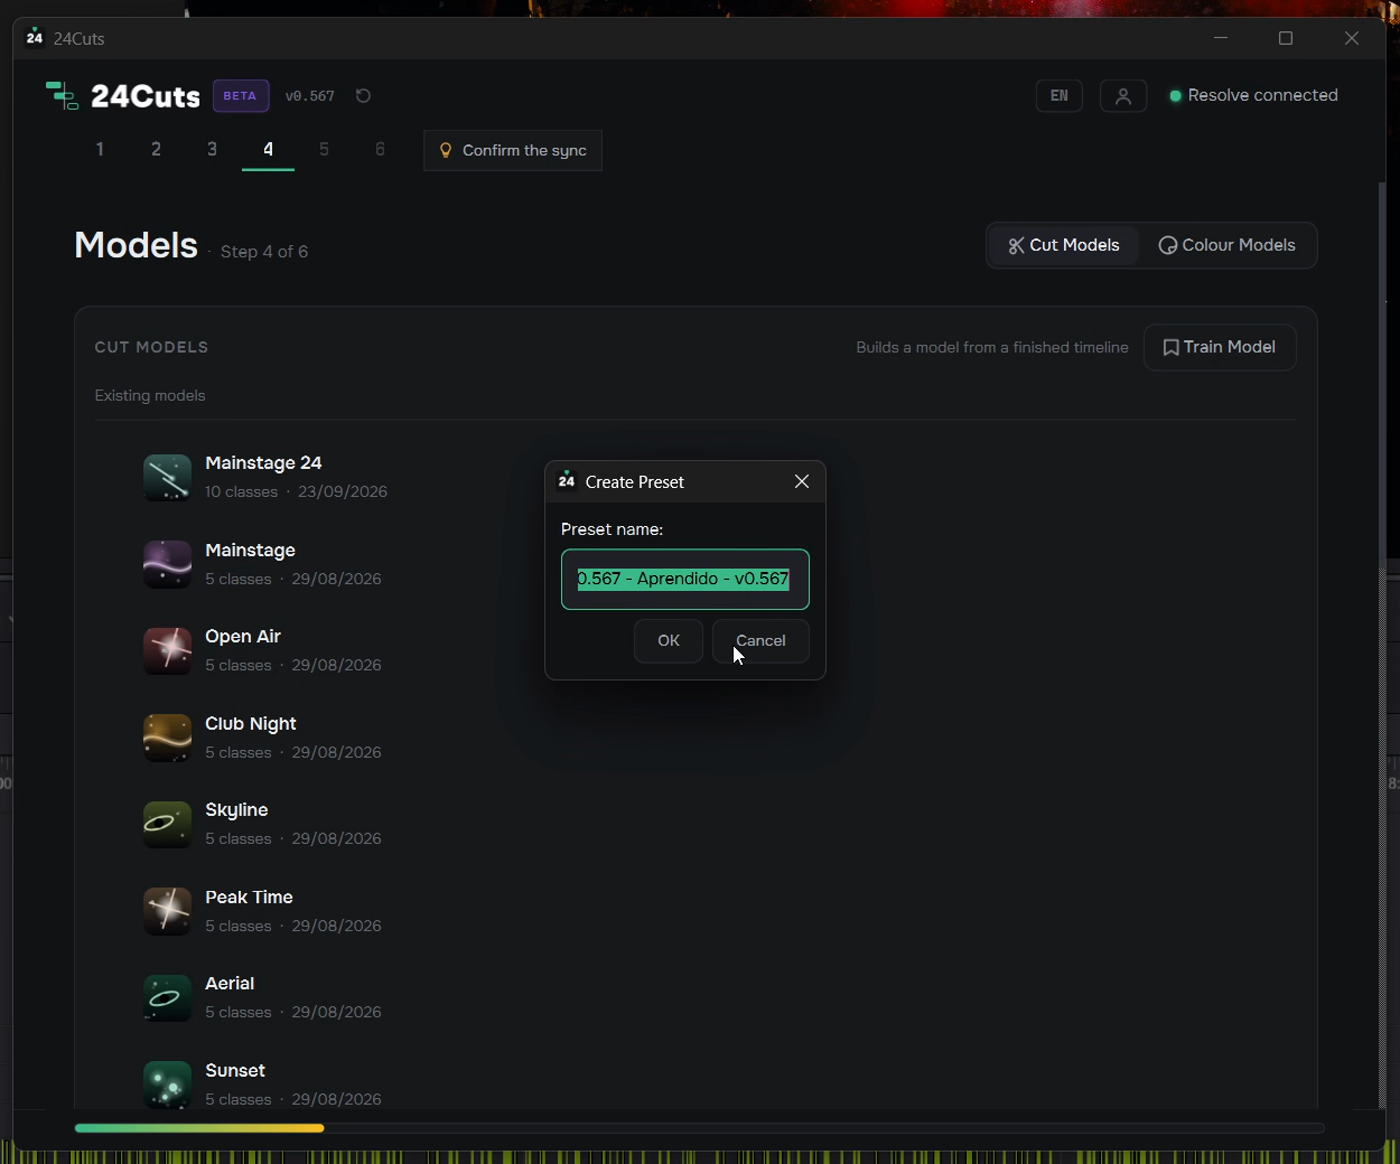
- Give the model a name when asked. It appears in Existing Models with the number of classes it learned, and is ready to use on Page 5 for any new set.
Good practice
- A model is only as good as the edit you feed it. Train on a set you would deliver, and on the full set: a short excerpt gives the model too few examples per class.
- The classes must match. A camera whose class is not in the model is ignored on Page 5, so reuse the same class names across your sets.
- Each plan has its own number of custom models: 1 on the Free Trial, 3 on Starter, 10 on Pro, 20 on Team and unlimited on Enterprise. Factory models do not count. Train one per venue, per genre or per client, and switch between them on Page 5.
Choose an editing style, or teach the app yours.
▶ Unsure about this page? Watch it in the video at 4:22Page 4 holds two kinds of models. Cut Models are editing styles: how long a shot holds, which camera follows which, what happens on a drop. Color Models are grades: one LUT or still per camera brand.
24Cuts ships with factory cut models, like Club Night, Mainstage, Peak Time, Open Air and Sunset. For our first session we will use a factory model. Once you have one edit you are proud of, train your own from it. There is no generative AI here. A model learns only from the timeline you give it.
On screen
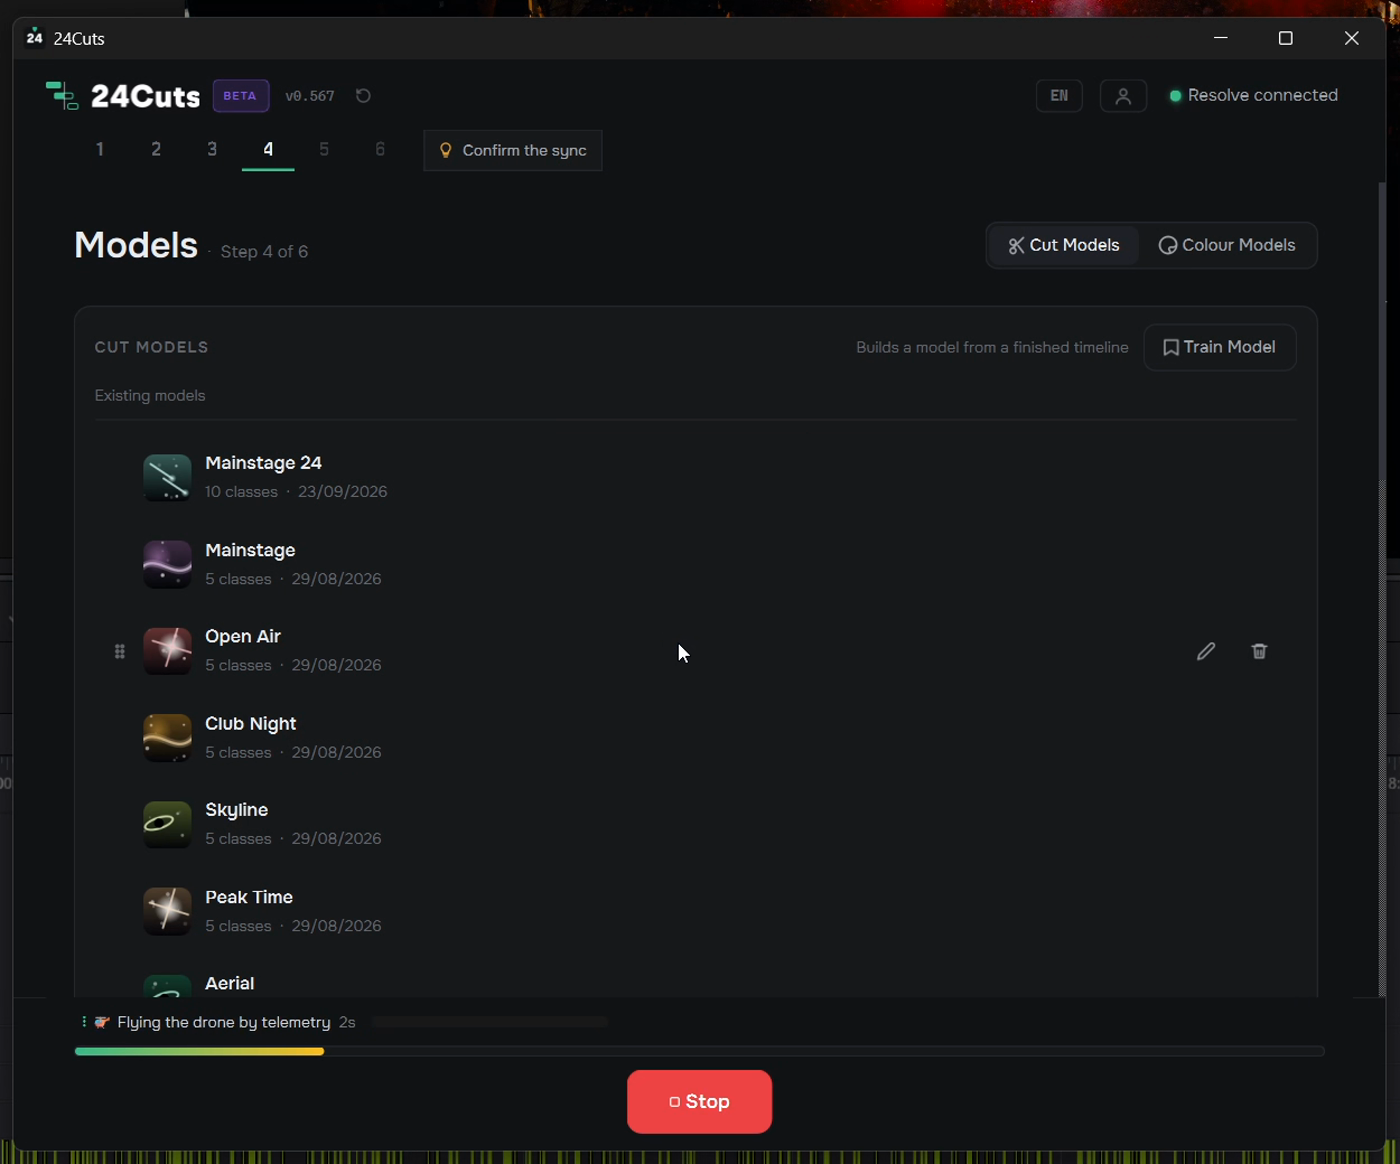
Cut Models: the Existing Models list with the factory models, and Train Model to create your own from an edited timeline.
Step by step
- Open Cut Models. The Existing Models list shows the factory models. Drag to reorder them: this is the order Page 5 will show.
- To train your own, follow the chapter Train a model, just above: an edited timeline, flattened from compound clips and multicam, mapped on Page 1 and analyzed on Page 3, then Train Model here.
- The new model appears in the list. Rename it, delete it, or drag it up.
- Switch to Color Models. Each camera brand found in the map has a row. Click Choose LUT / still and pick a .cube LUT or a .drx still exported from the Resolve gallery.
- A brand with two or more cameras can use Separate cameras, one grade per camera.
- Leave Apply automatically after the cut on. The grade is applied to the cut timelines as soon as Execute finishes.
Good practice
- The brand link uses the Camera Type and Input Gamma metadata of the clips. If a camera shows no brand, set it by hand from the row in the Camera Map.
- Apply color on timeline grades the timeline open in Resolve right now, without cutting. Useful to test a LUT before the session.
Page 5 is where the model meets the set. Learned mode uses a cut model. Manual mode gives you the sliders. Everything else on this page, rhythm, shot length, color and zoom, has an automatic setting that follows the model, and a manual override when you want it.
On screen
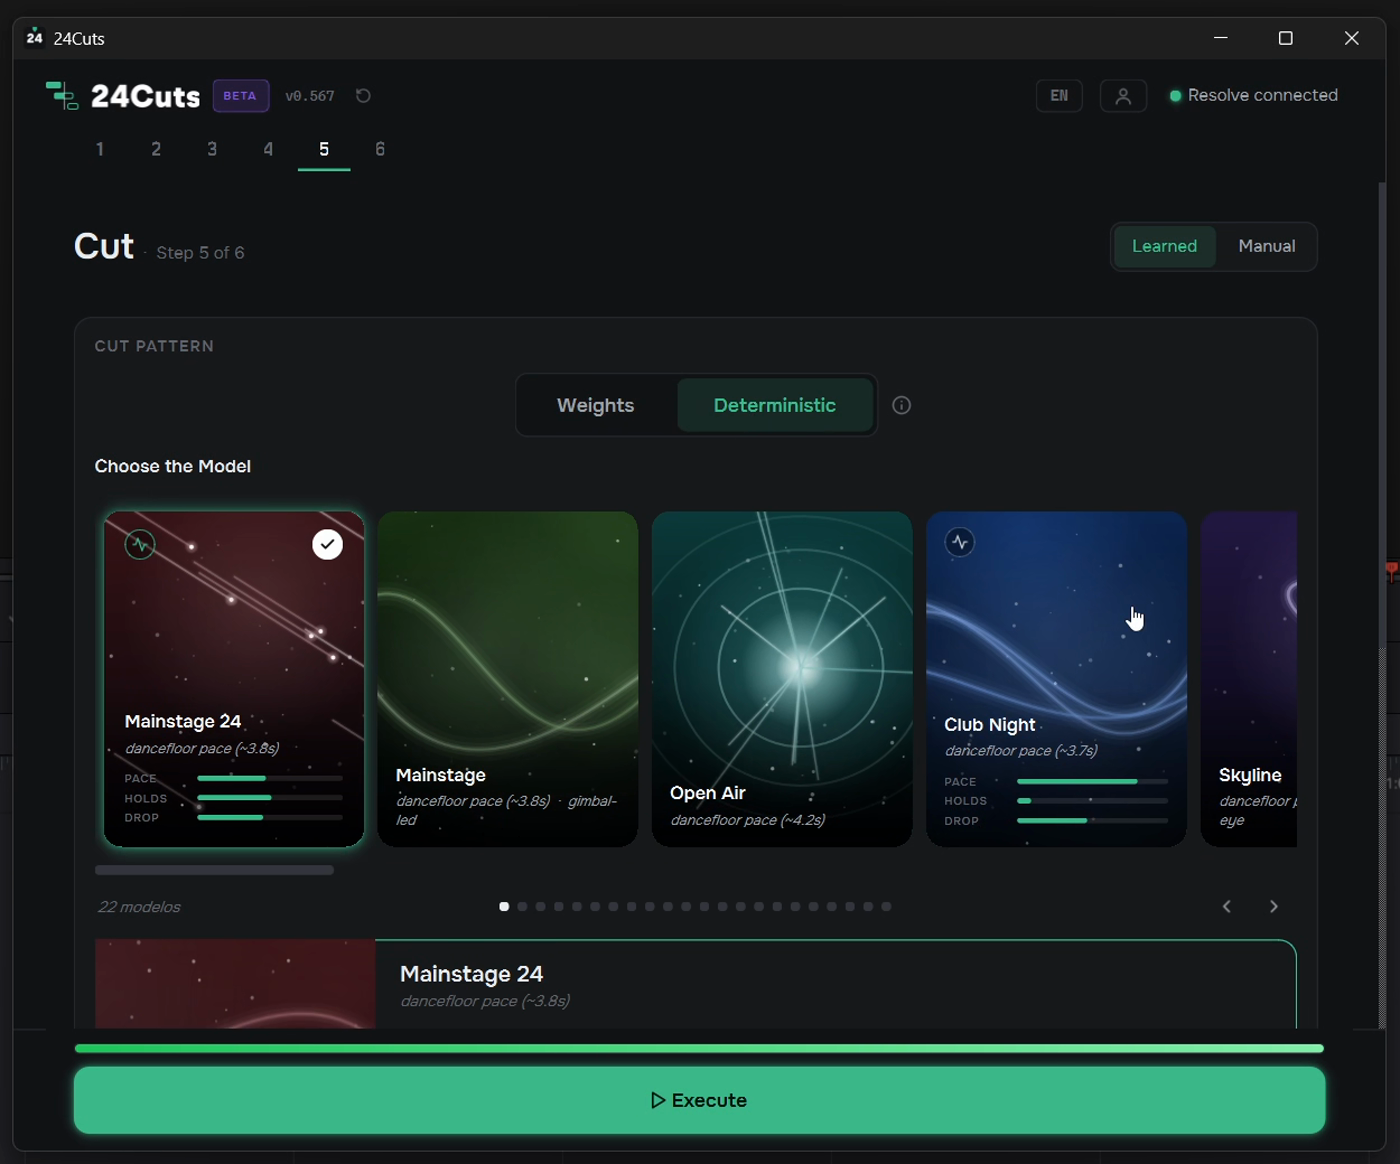
Cut page in Learned mode: Weights or Deterministic, the model gallery with a model selected, and Execute below.
Step by step
- Choose Learned. Browse the models with the arrows and click the one for tonight. For our set tonight, Mainstage.
- Click the X-Ray icon to read the model's DNA: Rhythm, Hold and Drop, the typical shot length, the favorite camera pair, and how often it changes camera on the bass.
- Pick the Learned sub-mode. Weights picks the camera of each moment respecting how often the model used it. Deterministic replays exactly the camera the model used in each musical situation.
- Leave Cut Rhythm and Shot Duration on Automatic. The model cuts on whole bars, like an editor does, with the hold times it learned per class.
- Confirm Apply Color Models after the cut. It is the same switch you saw on Page 4.
- Set the Dynamic Zoom. It adds a subtle, slow zoom to every take. Off, Dynamic In or Dynamic Out, with an intensity slider.
Good practice
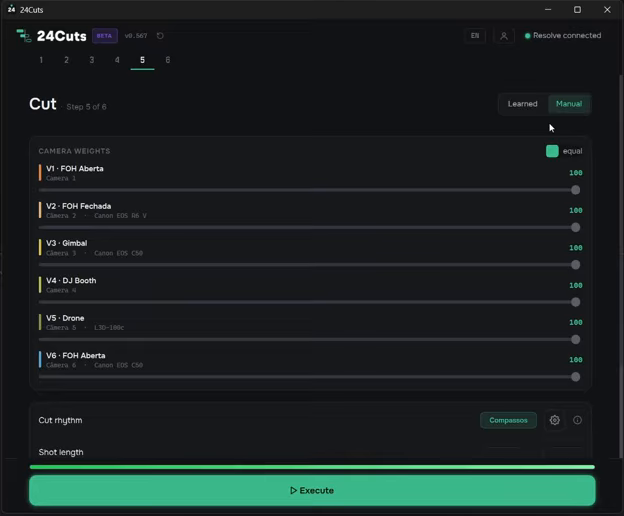
- Prefer to steer it yourself? Choose Manual: move the weight sliders per camera, or tick Equal, then pick Cut to Beat, Cut on Bar or Cut on 1/2 Bar, and set the minimum and maximum shot length.
- Apply now, next to the zoom, applies only the zoom to the timeline open in Resolve, without cutting again. Adjust the cut first, add the zoom after.
Name it, pick the formats, and press Execute.
▶ Unsure about this page? Watch it in the video at 8:02Page 6 turns the settings into timelines, all in the same Resolve project, named the way you build it here. Execute does the cut, then the color, then the zoom, then leaves only the reference audio active.
On screen
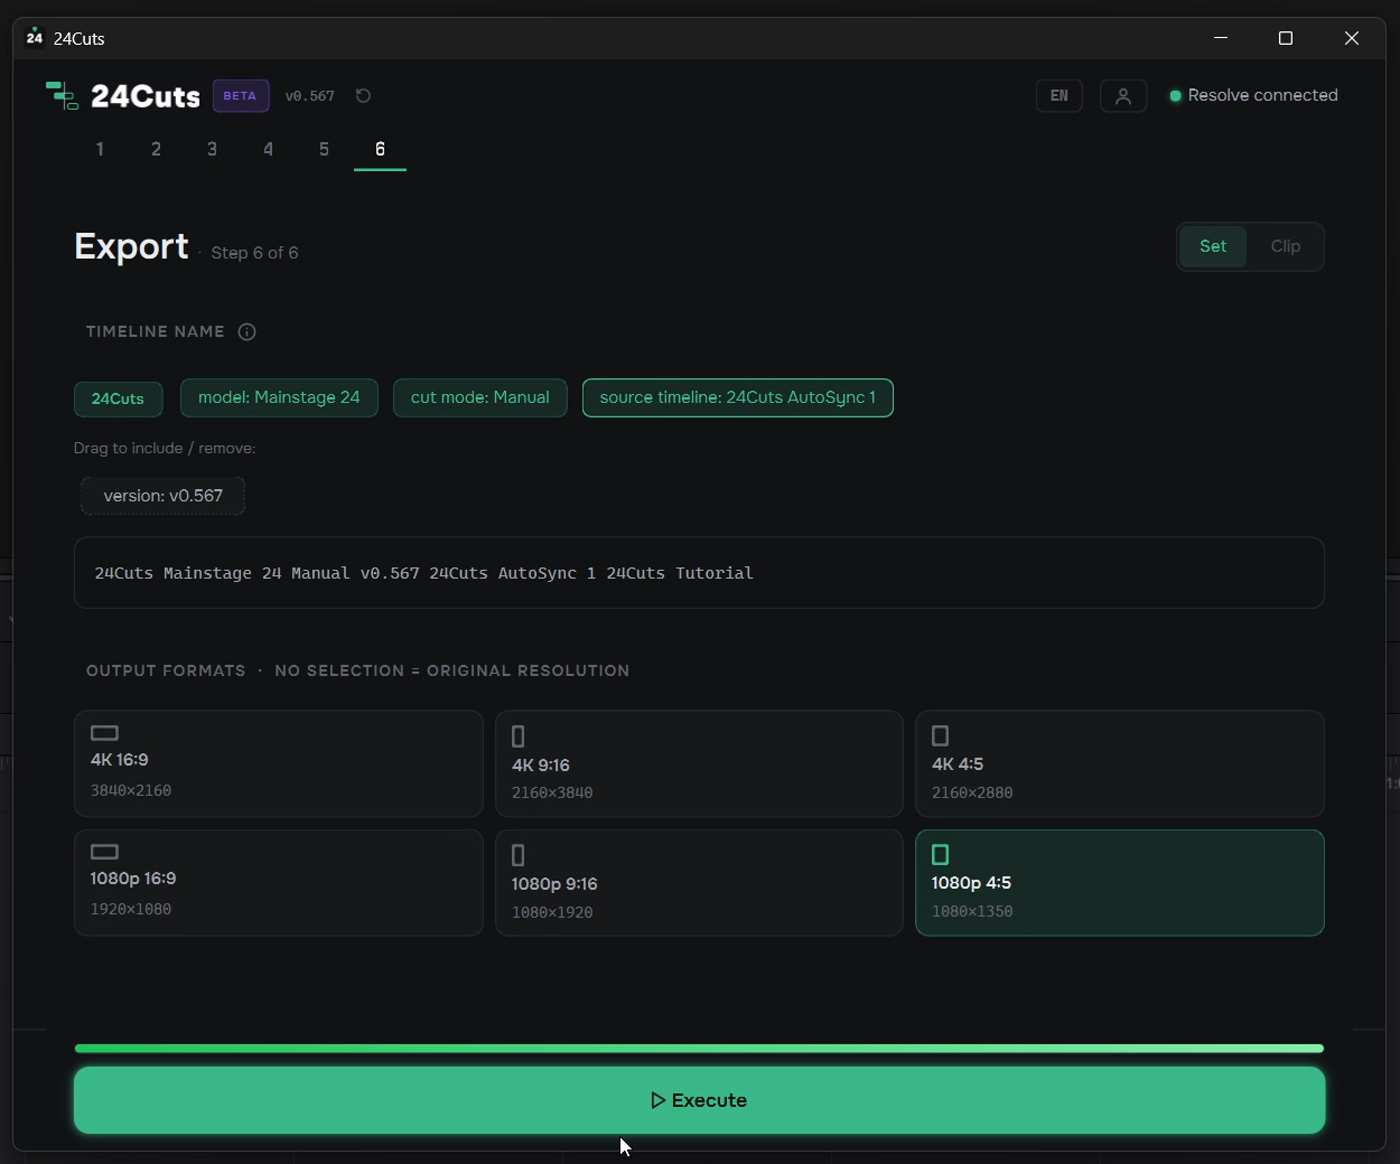
Export page: the timeline name built from chips, the grid of output formats, and the Execute button.
Step by step
- Choose the mode. Set cuts the whole set, switching camera on every drop, with the audio complete and untouched. Clip mode, for short highlights, is coming soon.
- Build the timeline name by dragging the boxes. 24Cuts is always first. Add the source timeline, the cut mode, the model and the version as you like.
- Select the formats. For our session: 4K 16x9 for the screen and 1080p 9x16 for stories. 4x5 is there for the feed.
- Click Execute in the bottom bar. The log shows each stage: cutting the takes, color, zoom, wrap-up.
- Open the new timeline in Resolve. Review it, adjust what you want, and render it from the Deliver page, as you always do.
Good practice
- If the name already exists in the project, the app adds (2), (3) and so on. Nothing is overwritten.
- All audio sources are imported into the cut timeline, but only the reference audio stays active. Enable the others in Resolve if you need them.
- Execute is greyed out? Page 3 needs at least one selected moment. Run Analyze and tick a moment.
Most problems have a one-line fix.
Every message the app shows points at the page that needs attention. These are the ones that come up most, with the cause and the fix.
| What you see | Why | Fix |
|---|---|---|
| Page 1 will not let me move on. | A row has no class, or an unused camera is still listed. | Give every row a class, delete the rows you will not use, then click Write Angles. |
| Train Model is disabled. | The angles of the reference project were not detected. | Go back to Page 1 on that project, classify the cameras and write the angles. Then train. |
| The Rekordbox status is not green. | Rekordbox is still open, so its library is locked. | Close Rekordbox and click the refresh button next to the status. |
| Execute is disabled. | No moment is selected on Page 3. | Run Analyze, then tick at least one moment in the list. |
| The app asked which timeline to use. | The project has more than one timeline open. | Pick 24Cuts AutoSync 1, or the synced timeline you chose on Page 2, and click OK. |
| A camera is late or early on the AutoSync timeline. | Its scratch audio was too quiet or too different from the master, or its timecode was not jam-synced. | Slide that clip on the timeline, then check Already synced on Page 2 and choose the same timeline. The next pages read the timeline. |
| The LUT did not apply to one camera. | That camera has no brand link. Its clips carry no Camera Type metadata. | On Page 1, set the brand by hand from the camera row, then click Apply color on timeline. |
| The sync stopped half way. | Resolve was used while the app was writing to the timeline. | Delete the partial AutoSync timeline, run Sync again, and leave Resolve alone until it finishes. |
That is the whole session. All your cameras in, graded timelines out, and the creative part still yours.